
Chances are your Trailer is equipped with brakes, and just like the brakes on your Tow Rig, your trailers brakes need some maintenance from time to time. When it comes to servicing your trailers brakes, and getting the right parts that fit your application, there are a few key points to consider that will ensure you can properly identify your brakes, as well as some tips as to why your brakes may not be functioning properly.
- Identifying Electric Brakes
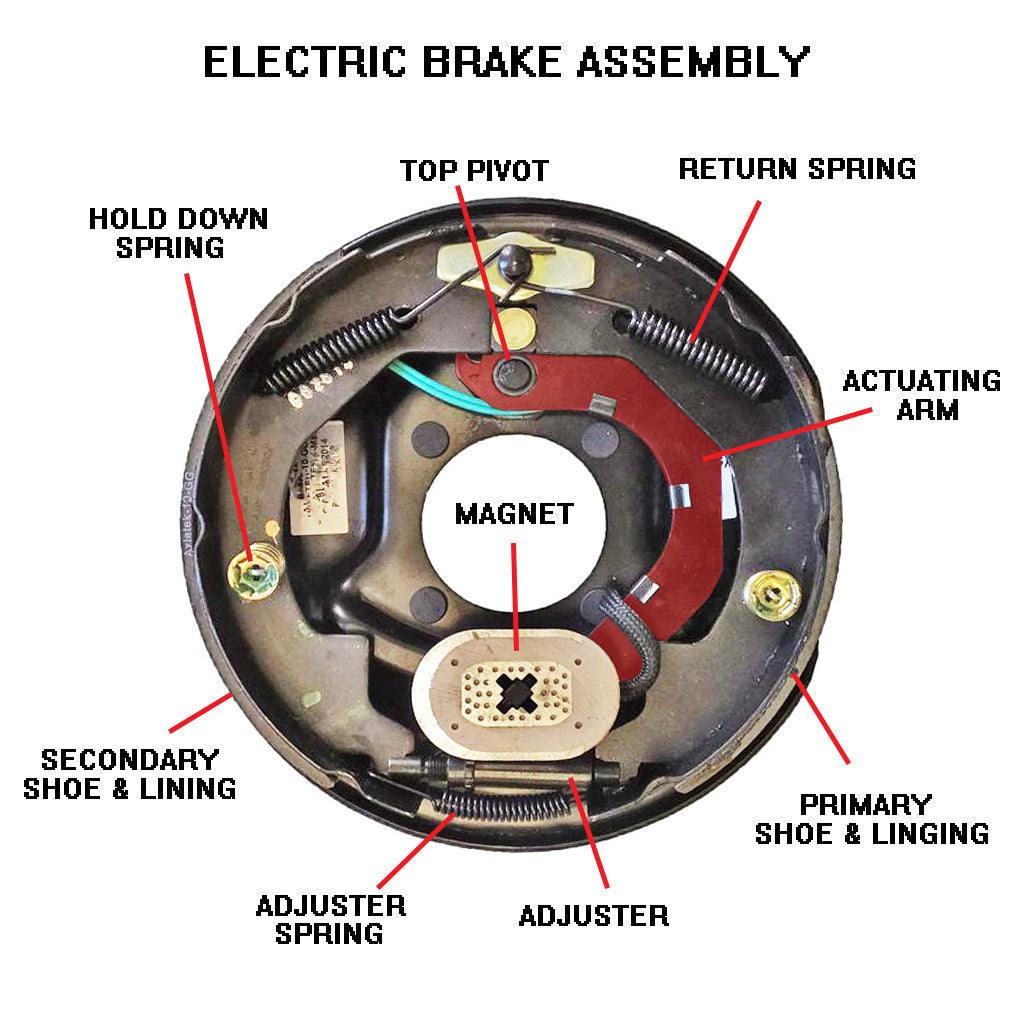
- Right or Left: With the magnet positioned at the bottom of the brake, the actuating arm will start at the "Top Pivot" and curve downward towards the "Magnet". Arms curving Left, are left hand assemblies, where as arms curving Right, are right hand assemblies.
- Size: Measure the diameter of the mounted shoe assemblies across the front center, then measure the width of the shoe lining. This will give you your brakes size.
- Flange Mount: Determine the number of mounting bolts on your brake by counting the mounting holes, or studs on your brakes assembly.
- Replacement Parts: Sometimes a brakes functions can be restored by replacing a key component. Where as in some cases it may be cost effective to replace the entire brake assembly. Here is a list of the common replaceable parts.
- (1) Magnet
- (2) Return Springs
- (2) Hold Down Springs
- (2) Show linings Primary, and secondary
- (1) Adjuster
- (1) Adjuster Spring
- Troubleshooting Faulty Brakes:
- Magnets: The first and most common sign of a faulty magnet is erratic Brake Control Behavior. Magnets control the intensity of the brakes by grabbing the inside face of your brake drum, engaging the brake shoes. Magnets should be checked for exposed windings, and pinched or frayed wires. The face of the magnet also reflects the inside surface of your brake drum. In order for the magnet to "grab" the drums surface, both surfaces must be alike. For example; A new magnets surface will be flat, where as the drums inside face may not be flat, creating less "grabbing surface" for the magnet, and weaker brakes.
- Brake Adjustment: In order for your brakes to operate as they should, they must be adjusted from time to time. Even self adjusting brakes fail to properly adjust themselves if key components begin to wear. Start by manually turning the Adjuster until you cannot turn the wheel, then back off the adjuster until the wheel is able to spin freely. A properly adjusted brake will have a Slight Constant Drag on the shoes.
- Adjuster & Spring: The Adjuster is located below the magnet, and should be "turn-able" but also under constant pressure from the Adjuster spring. A worn out Adjuster is unusual, but they are prone to freezing or seizing up. Sometimes you can hear them "rolling around" inside your hub/Drum assembly, this is a sign the adjuster was maxed out, or the spring is broken. A maxed out adjuster can also mean your brakes are ready for new Shoes and Linings. ( If your shoes and linings are not worn out, and the Adjuster is maxed out: you need to check your Hold Down Springs, or check the drums inside bore diameter to ensure it is within maximum re-bore spec's which is located on inner lip of the brake drum ).
- Return & Hold Down Springs: Common signs of worn or weak springs inside your brakes are: Heat, Brake Drag, or "stinky Brakes". When a Return Spring becomes weak or fails, the shoes may not retract or may become stuck, generating excessive heat or causing brake failure. Hold Down Springs keep your brake linings aligned and centered, as well as mounted on the brake backing plate assembly. Worn out hold down springs will cause premature brake failure.
- Shoes and Linings: Shoes and linings should wear even throughout the entire assembly. Irregular wear on the linings can usually be corrected by properly adjusting the brakes, and ensuring the return springs are properly functioning.
- Check out Our Selection of Brake Parts! As it grows everyday!
Comments