Tips and Tidbits

How To Identify & Measure a Scissor Hoist Cylinder

Scissor Hoists have been the workhorse on our favorite Dump Trailer for the past decade or more! Scissor hoists gets you the best of both worlds, strong lifting power, with the best dump angle! But sometimes parts wear out... And when your cylinders not up for the job, your trailer wont be either.... 

Cylinders are costly to rebuild, and hard to find locally! 

That's why we stock them. Keep your trailer dumping with a Premium Rugby Cylinder. 

Measuring and Identifying your unit is simple! Use this guide to help you determine what cylinder your Hoist needs.

Check out our Cylinders Here!

"The Proper Way to Burnish your Trailer Brakes"

Burnishing Your Brakes:

 
At OTP. we know there is nothing more frustrating than having just installed brand new parts only for them to seem unresponsive or just not work! The good news is, Lippert Components has got you covered! Check out this nifty "how to" video to show you what it takes to get those new brakes performing like they should! Happy Braking!


      AXLE PLACEMENT & TONGUE WEIGHT

      The foundation to every great Trailer, its Axles!

        If you find yourself looking to upgrade, replace, or even build a trailer from scratch, you may want, or need to find the correct axle location on your trailer. Axle placement on any trailer is critical! Determining the correct location can be confusing, nerve racking, or even frustrating. The goal of having your axles correctly placed is a balance of function between your trailer, and the tow vehicle. Finding this balance between will result in a PREDICTABLE and safe towing trailer! 

      Check out this handy reference sheet to help you identify axle placement!


      Camper Style Custom Door Order Form

      Camper Style Custom Door Order Form
      Looking to replace a cargo or horse trailer camper style door?

      Read more →

      Back Up and Observation Camera

      Back Up and Observation Camera

      The new Vision 2 Observation camera from Furrion is in a league of its own. 

      For the past few years, the wireless camera after-market line up has been pretty "archaic" to say the least, with poor signal, poor picture, poor quality, all leading to a poor experience. A wireless camera system is supposed to make hard tasks easy, like changing lanes on the highway, backing into tight spots, or even checking your load. Unfortunately, a wireless setup that actually works, could cost you big bucks...Not Anymore 

      Furrion's Vision 2 features the latest in 2.4Ghz technology, for a clear picture, up to 100 feet, with no interference. Furrion's infrared camera streams its picture to a 4.3" LCD color display. Featuring image stabilization, night vision, direct pairing, and its vibration resistant. Tested for natures extreme climates, with a viewing angle of 110*, keeping an eye on your rig has never been easier. And its now possible.

      In our own words, "We have the Vision 2 Observation System on our RV, and we don't know how this camera hasn't made its way onto every RV...We love it"

      Click here to see our Furrion products on sale now.

      Happy towing!


      INCANDESCENT VS LED

      INCANDESCENT VS LED

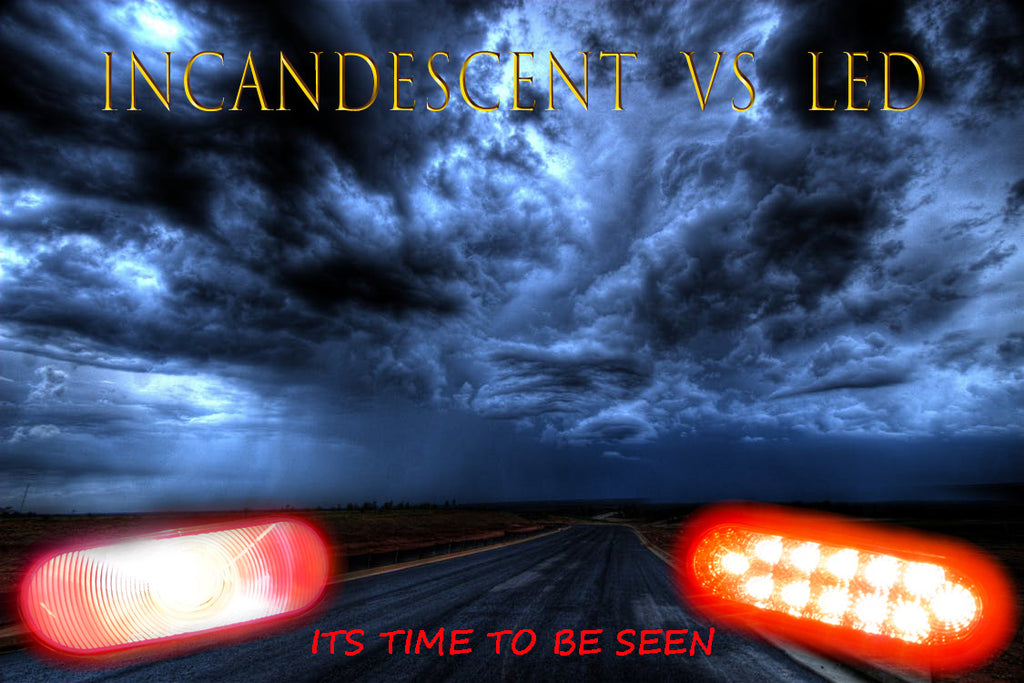
      Incandescent lights have been illuminating our roads since the early 1920's. Until now!

      It is no secret that the trailer/automotive world has jumped on the LED train, and there are a few good reasons why you should too!

      LED, short for (Light Emitting Diode) lights have many advantages over Incandescent lights. The three biggest being performance, efficiency, and life expectancy.

      BE SEEN: LED lights are significantly brighter, and provide a more focused illumination in almost every installed location when compared to traditional incandescent lights. Which means you have a much greater chance of being seen on the road. Having brighter brake lights, turn signals, and clearance lights all contribute to the safety of you and your rig.

      EFFICIENCY: When compared to Incandescent lights, LED lights can draw as much 90% less amperage to function at full capacity, translating into less draw and demand from your trailers connections and any power source.   

      LIFE: In some cases, LED lights have been known to out last incandescent lights by over 6 times that of an average incandescent lifespan. This is due to LED lights not relying on brittle filaments inside the bulb to create light. In addition, most LED lights are sealed in their own housing, making them impervious to water.

      COST: When compared to standard incandescent lights, the LED is usually more expensive. This is due to the additional steps and manufacturing process to develop LEDs. But keep in mind, when you make the switch to LED lights, you can count on all your lights needing less repairs and replacements. The initial up front cost may be more, but your lights can now last 6 times as long, saving you money. 

      THE SWITCH: Converting to LED Lights is as easy as replacing your incandescent light fixture with the new LED light fixture. ITS THAT SIMPLE!!! Most LED lights are also designed with identical standardized mounting holes. Meaning that there is a good chance your light has a drop in replacement in its new LED form.

      Its time for your trailer to be seen, please browse through our selection and contact us with any questions. we would love to help you make the switch. 

      ARCTIC CORD

      ARCTIC CORD

      Don't let the cold, "freeze" up your schedule!

      Most standard 7-way trailer connections can withstand below freezing temperatures... as long as you don't plan on using them in freezing temperatures for very long. If you do find yourself hauling out in the cold frequently, you may want to consider the Arctic Cord.  

      Arctic Cord remains flexible, and wont split when you need it most. Heavy duty construction from the self-cleaning double pins, to the sealed silicone bonded wires, Have been specially formulated to withstand the bitter cold. Rated to a chilly -40*C. Being flexible in freezing climates is key to not cracking or splitting wires.

      Or, maybe you like to tow your favorite rig across the scorching trails in Death Valley, The Arctic Cord is still your best bet! Rated at a boiling 105*C, or 221*F!

      With a sealed, flexible, and snug fitting Arctic Cord, you can rest assured your rigs 7-way connection wont be putting the FREEZE on your plans!!!

      And for your convenience, we stock 3 different lengths just for you! 

      Check out our selection!

      Identifying and Troubleshooting Electric Trailer Brakes

      Identifying and Troubleshooting Electric Trailer Brakes

      Chances are your Trailer is equipped with brakes, and just like the brakes on your Tow Rig, your trailers brakes need some maintenance from time to time. When it comes to servicing your trailers brakes, and getting the right parts that fit your application, there are a few key points to consider that will ensure you can properly identify your brakes, as well as some tips as to why your brakes may not be functioning properly.

      • Identifying Electric Brakes
      1. Right or Left: With the magnet positioned at the bottom of the brake, the actuating arm will start at the "Top Pivot" and curve downward towards the "Magnet". Arms curving Left, are left hand assemblies, where as arms curving Right, are right hand assemblies.
      2. Size: Measure the diameter of the mounted shoe assemblies across the front center, then measure the width of the shoe lining. This will give you your brakes size.
      3. Flange Mount: Determine the number of mounting bolts on your brake by counting the mounting holes, or studs on your brakes assembly.
      4. Replacement Parts: Sometimes a brakes functions can be restored by replacing a key component. Where as in some cases it may be cost effective to replace the entire brake assembly. Here is a list of the common replaceable parts. 
        • (1) Magnet 
        • (2) Return Springs 
        • (2) Hold Down Springs
        • (2) Show linings Primary, and secondary
        • (1) Adjuster
        • (1) Adjuster Spring 

      • Troubleshooting Faulty Brakes: 
        • Magnets: The first and  most common sign of a faulty magnet is erratic Brake Control Behavior. Magnets control the intensity of the brakes by grabbing the inside face of your brake drum, engaging the brake shoes. Magnets should be checked for exposed windings, and pinched or frayed wires. The face of the magnet also reflects the  inside surface of your brake drum. In order for the magnet to "grab" the drums surface, both surfaces must be alike. For example; A new magnets surface will be flat, where as the drums inside face may not be flat, creating less "grabbing surface" for the magnet, and weaker brakes. 
        • Brake Adjustment: In order for your brakes to operate as they should, they must be adjusted from time to time. Even self adjusting brakes fail to properly adjust themselves if key components begin to wear. Start by manually turning the Adjuster until you cannot turn the wheel, then back off the adjuster until the wheel is able to spin freely. A properly adjusted brake will have a Slight Constant Drag on the shoes. 
        • Adjuster & Spring: The Adjuster is located below the magnet, and should be "turn-able" but also under constant pressure from the Adjuster spring. A worn out Adjuster is unusual, but they are prone to freezing or seizing up. Sometimes you can hear them "rolling around" inside your hub/Drum assembly, this is a sign the adjuster was maxed out, or the spring is broken.  A maxed out adjuster can also mean your brakes are ready for new Shoes and Linings. ( If your shoes and linings are not worn out, and the Adjuster is maxed out: you need to check your Hold Down Springs, or check the drums inside bore diameter to ensure it is within maximum re-bore spec's which is located on inner lip of the brake drum )
        • Return & Hold Down Springs: Common signs of worn or weak springs inside your brakes are: Heat, Brake Drag, or "stinky Brakes". When a Return Spring becomes weak or fails, the shoes may not retract or may become stuck, generating excessive heat or causing brake failure. Hold Down Springs keep your brake linings aligned and centered, as well as mounted on the brake backing plate assembly. Worn out hold down springs will cause premature brake failure.
        • Shoes and Linings: Shoes and linings should wear even throughout the entire assembly. Irregular wear on the linings can usually be corrected by properly adjusting the brakes, and ensuring the return springs are properly functioning.
        • Check out Our Selection of Brake Parts! As it grows everyday!

      Trailer Bolt Pattern Measurement Guide

      Trailer Bolt Pattern Measurement Guide

      Here is a little graphic to aid in the measuring of your trailer wheel so you can identify its correct pattern.

      Trailer Tire Wear Information

      Trailer Tire Wear Information

      The following trailer tire wear chart is courtesy of NATM's "Safely Towing a Trailer" manual.